Pages

5.30.2012

Banana Cupcakes with Cream Cheese Frosting


My dad's birthday was on Memorial Day this year and, although we couldn't be with him to help celebrate, I decided to make banana cupcakes in his honor. Nothing makes him happier than banana cupcakes, banana cake or frankly anything related to the banana family. These banana cupcakes are pretty tasty if I do say so myself. I took Sandy's Banana Bread recipe and did a bit of tweaking to make the cupcakes more fluffy and cake-like rather than dense and bread-like. I think they were a huge success and as always the cream cheese frosting knocks them out of the park. I only wish that my dad could of eaten some of these but at least he was there in spirit!

You Will Need for the Cupcakes:
  • 1/2 cup butter softened (1 stick)
  • 1 cup sugar
  • 2 eggs, beaten
  • 3 overly ripe bananas, mashed (Note: An easy way to mash is to peel bananas and place on plate. Use potato masher to mash bananas)
  • cups flour
  • 1/2 tsp baking soda
  • 1 tsp baking powder
  • 1 Tbsp vanilla extract
  • 1 box banana cream pudding mix

You Will Need for the Cream Cheese Frosting:
  • 4 cups confectioners sugar
  • 1 stick butter, melted
  • 8oz cream cheese, softened

Here We Go for the Cupcakes:
  • Preheat oven to 350 degrees
  • Line a standard 12-cup muffin pan with paper liners
  • In a medium bowl, whisk together flour, sugar, baking powder, baking soda, and salt
  • Add butter, mashed bananas, eggs, and vanilla to dry mixture
  • Stir to incorporate flour mixture (be careful not to over mix)
  • Dividing evenly, spoon batter into muffin cups
  • Bake until a toothpick inserted in center of a cupcake comes out clean, 25 to 30 minutes
  • Remove cupcakes from pan; cool completely on a wire rack
  • Spread tops with cream cheese frosting

Here We Go for the Cream Cheese Frosting:
  • Beat sugar, butter and cream cheese with an electric mixer until creamy
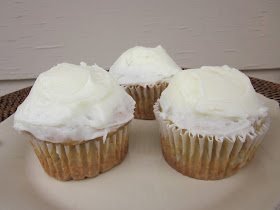
Makes 12 Cupcakes
Happy Feasting!


5.22.2012

Grilled Island Chicken Kabobs

We use our grill so much these days, that I now sit and wonder what we ate when we lived in New York and Charlottesville and were grill-less. This recipe was originally for chicken breasts but I decided that I wanted to include some fresh veggies so I figured a kabob was the best  way to go. I cheated and bought pre-made Chicken kabobs at the grocery store but you can always make your own; using whichever veggies you prefer, a cut up chicken breast and wooden sticks. The island marinade is delicious and in the summer nothing tastes better than meat that has been charbroiled.

Adapted from: Melskitchencafe.com

You Will Need:
  • 1/3 cup vegetable oil
  • Juice from 2 freshly squeezed lemons
  • 1 1/2 Tbsp soy sauce
  • 1 garlic clove, finely minced
  • 1/2 tsp dried oregano
  • 1/4 tsp salt
  • 1/4 tsp pepper
  • 2 Pre-made Chicken kabobs

Here We Go:
  • Combine all ingredients, except chicken kabobs, in a large airtight plastic bag
  • Shake well until the marinade is well mixed
  • Add the kabobs to the plastic bag so that they are covered by the marinade and seal the bag tightly. Refrigerate and marinate overnight if possible. If not, I would suggest marinading for at least 1-2 hours at the minimum)
  • Preheat a gas or charcoal grill to medium heat
  • Grill the chicken kabobs for 6-7 minutes per side (depending on how thick the chicken pieces are), until the chicken is no longer pink in the center (if you have a meat thermometer, the chicken should register 165 degrees)
  • Tent with foil and let the chicken kabobs rest for about five minutes before serving

Serves 2
Happy Feasting!

5.21.2012

Tailgate Deviled Eggs


'Tis the season for deviled eggs! With Memorial Day weekend quickly approaching, there will be cook-outs galore and many a deviled egg will be eaten. This recipe is an oldie, but a goodie and I can't believe that it has taken me this long to actually post it. I make deviled eggs all the time for various occasions and I finally made a conscious effort to actually make note of each measurement so that I could share it with all of you. I would highly suggest making more than you need so that you can certainly enjoy a few before your guests devour all of them.

You Will Need:
  • 12 eggs
  • 1/4 cup mustard
  • 2/3 cup Mayonnaise
  • 1/3 cup pickle relish
  • 1/4 tsp pepper
  • 1/4 tsp salt
  • Sliced baby gherkins and paprika for garnish

Here We Go:
  • First step is to hard boil the eggs (See all 8 steps below)
  • Fill up a large saucepan half-way with water and gently add the eggs
  • Cover the eggs with at least an inch of water
  • Add a pinch of salt to the water
  • Bring the water to a boil
  • Cover, and remove from heat
  • Let sit covered for 12-15 minutes
  • Drain hot water from pan and run cold water over the eggs. (At this point if you crack the egg shells while the eggs are cooling, it will make it easier to peel the shells.)  
  • Peel the eggs
  • Using a sharp knife, slice each egg in half, lengthwise
  • Gently, using a small spoon, remove the yolk halves and place in a mixing bowl
  • Arrange the egg white halves on a serving platter
  • Using a fork, mash up the yolks and add mustard, mayonnaise, pickle relish, salt and pepper
  • Spoon egg yolk mixture into the egg white halves
  • Sprinkle with paprika and top with baby gherkin

Makes 2 Dozen Eggs
Happy Feasting!

5.16.2012

Peanut Butter Chocolate Bars


I said "no" to Pinterest for months, and a few weeks back I caved, and now I am addicted! It is such a great place to find inspiration for everything. From entertaining, to your home, to your wardrobe, to your organizational skills and my personal favorite of course- cooking! I am shocked that I only have 29 food pins thus far, but I can assure you that number is going to quickly become my largest board.

My husband needed to make dessert for a community service project and I had "pinned" these decadent bars and knew this was what I had to make. These peanut butter and chocolate bars are heaven. They are rich and definitely not bikini friendly but after you indulge you will not regret it. These puppies are worth each and every calorie. After all, it's not even Memorial Day weekend yet, you 've got plenty of time!

Source: The Girl Who Ate Everything

You Will Need:
  • 1 (18.25) package plain yellow cake mix
  • 1/2 cup butter, melted
  • 1 cup creamy peanut butter
  • 2 eggs
  • 1 (12 oz) package semi-sweet chocolate chips
  • 1 (14 oz) can sweetened condensed milk
  • 2 Tbsp butter
  • 2 tsp vanilla

Here We Go:
  • Preheat oven to 325 degrees
  • Combine cake mix, melted butter, peanut butter, and eggs in a large bowl using a mixer or spoon Press this into a 9X13 pan reserving 1 1/2 cup of the mixture to crumble on top
  • In a small pot, melt chocolate chips, sweetened condensed milk, and butter
  • Remove from heat and stir in the vanilla
  • Spread chocolate mixture over the mixture pressed in the pan and then crumble the 1 1/2 cups of reserved cake mixture on top evenly
  • Bake for 20-25 minutes
  • Cool completely before cutting into bars

Happy Feasting!

5.14.2012

TC's Chicken and Vegetable Soup


I think it has been raining for days. Okay, maybe it has only been raining for the last 24 hours but it sure seems like it it has been much longer than that. This Chicken and Vegetable soup has already been posted over on Foodie.com but in case you missed it I thought I would now post it on my actual blog. The recipe is simple and has been in my family for years. It is the perfect soup for  new neighbors, a new mother, a sick friend or even a rainy day weeknight meal. It is packed full of hearty vegetables and shredded white meat chicken. I love to serve it with warm poppy seed ham biscuits or fresh cornbread although it is definitely hearty enough to serve all by itself!

You Will Need:
  • 4 quarts chicken stock
  • 3 large boneless chicken breasts
  • 2 medium white potatoes, peeled and cut into small chunks
  • 1 cup diced yellow onion
  • 1 can white corn, drained
  • 1 can green beans, drained
  • 1 can diced tomatoes
  • 1 1/2 cups tomato juice
  • 4 bay leaves
  • 2 tsp dried basil
  • 2 tsp pepper
  • 1 tsp minced garlic

Here We Go:
  • Boil chicken breasts in chicken stock until cooked through, about 25-30 minutes
  • Remove chicken from broth and shred chicken into small, bite size pieces
  • Add black pepper, garlic, bay leaves, dried basil and tomato juice to pot
  • Add vegetables and shredded chicken back to pot and bring to boil.
  • Reduce heat and let simmer for 1 hour
  • Remove from heat and let stand


Serves 6-8
Happy Feasting!


5.09.2012

Strawberry, Spinach & Goat Cheese Salad


I had this salad at a bridal shower and after eating it I couldn't stop thinking about how fresh, delicious and beautiful it was. I asked one of the hosts if she wouldn't mind sharing the recipe and now, over a year later, I finally remembered to take a picture of this gorgeous dish before we devoured it. With strawberry season in full swing, this would be the perfect side dish for anything made on the grill. Top it with shrimp, chicken or steak and this salad would even make the perfect main course! Isn't it pretty?

You Will Need for the Almond Topping:
  • 3 tbs of sugar
  • 1/2 cup sliced almonds

You Will Need for the Dressing:
  • 2 Tbs apple cider vinegar
  • 1/4 cup corn or vegetable oil
  • 2 Tbs sugar
  • 1/4 tsp of salt

You Will Need for the Salad:
  • 4 oz baby spinach
  • 1/4 cup chopped green onions, including tops
  • 1/4 cup chopped celery
  • 1/4 cup chopped cucumber
  • 1 cup of fresh strawberries; halved
  • 1/4 cup crumbled goat cheese

Here We Go for the Almond Topping:
  • Place small saucepan over medium heat , add sugar and stir constantly while sugar melts and turns a pale golden brown
  • Add almonds and stir to coat; remove from heat and pour on a piece of foil to cool
  • When cool, crush almonds coarsely and set aside

Here We Go for the Dressing:
  • Whisk together vinegar, oil, sugar and salt
  • Chill before serving

Here We Go for the Salad:
  • Wash spinach and pat dry
  • Place spinach in large salad bowl and add chopped celery, cucumber,and onion
  • Top with strawberries, goat cheese and almonds
  • Add dressing and toss just before serving

Serves 2
Happy Feasting!

5.07.2012

Grilled Pork Tenderloin with Pineapple Salsa


Adapted from A Hint of Honey

Temperatures are rising and grills are being fired up across the country as schools are getting ready to host graduations, and businesses are about to begin summer hours and summer Fridays! I love the summer season because your days are so much longer and the pace of everyday life seems to be a bit more relaxed. This pork tenderloin is very simply prepared on the grill and topped with this vibrant summer salsa. The sweetness of the pineapple mixed with the red onion, bell pepper and cilantro gives a fresh flavor to every bite.


You Will Need For the Pork Tenderloin:
  • 2 lb. pork tenderloin
  • Juice from 8 limes
  • 6 cloves garlic, minced
  • 2 tsp freshly ground black pepper
  • 2 tsp ground cumin
  • 2 tsp oregano
  • 1 1/2 tsp sea salt
  • Extra virgin olive oil

You Will Need for the Salsa:
  • 1 large pineapple, diced
  • 1 red bell pepper, seeded and diced
  • 1 yellow bell pepper, seeded and diced
  • 1/2 red onion, diced
  • 1/2 cup fresh cilantro, chopped
  • 1 lime, juiced
  • 2 tsp brown sugar
  • Salt and freshly ground black pepper, to taste

Here We Go:
  • To make the marinade, in a small bowl, whisk to combine the lime juice, garlic, pepper, cumin, oregano, and salt
  • Place the pork tenderloin in a plastic Ziploc bag and pour the marinade over the pork
  • Refrigerate for 1 hour
  • In a large bowl, toss to combine the pineapple, peppers, onion, cilantro, lime juice, and brown sugar
  • Season to taste with salt and pepper
  • Refrigerate until ready to serve
  • To grill the pork, preheat an outdoor grill or indoor grill pan to medium-high heat
  • Discard the marinade
  • Brush the pork with olive oil and place on the grill
  • Cook until the pork is only slightly pink (roughly 5-7 minutes) 
  • Remove from the grill and let rest at least 5 minutes before slicing
  • Serve topped with pineapple salsa

Serves 4-6
Happy Feasting!

5.01.2012

Greenbrier Summer Salsa


This fresh salsa is a summer favorite in our house. My mother created this dip after having it served to her at The Greenbrier. It is about as easy as it gets with only have six ingredients and keep in mind that these portions are only a rough estimate. If you have a bigger group, use more and for a smaller group obviously use less. It is a great appetizer or side for summer cookouts or (a Cinco de Mayo party)! I also think it is a great dip to make ahead of time and then have in the refrigerator for your family (or just you!) to snack on throughout the week.

You Will Need:
  • 1/2 cup fresh sweet white corn (cut from ear)
  • 1/2 cup chopped green pepper
  • 1/2 cup chopped red pepper
  • 1/2 cup chopped red onion
  • 1/2 can black beans; drained and rinsed
  • 1 Tbsp of chopped/minced fresh cilantro plus more for garnish
  • 1/2 cup Raspberry Salsa (I used Robert Rothchild Farm)
  • Tortilla chips or crackers for serving

Here We Go:
  • Mix together corn, green pepper, red pepper, red onion, and black beans
  • Add the Raspberry salsa and then mix again
  • Sprinkle with cilantro and mix again
  • Let set for a hour or so (or overnight) in refrigerator for all tastes to blend.
  • Serve with tortilla chips or crackers
  • Garnish with fresh cilantro

Serves 6-8 as an Appetizer
Happy Feasting!